A Small Table Display for Sharing a Personal Project
A small table display for a personal project helps visitors understand what you made, why it matters and where to look without crowding the work.
A small table display for a personal project has one job: help someone understand what you made before the conversation moves on. Choose one object to lead, give it room, and make the explanation easy to find. A ceramic cup, a hand-bound notebook or a repaired lamp can all hold attention without a wall of supporting material.
The plan below treats the table as a short, in-person introduction, not a miniature exhibition. Each choice should make the project easier to notice and discuss.
1. What should visitors notice first?
Pick one focal item: the finished piece, a particularly revealing part, or a single image that shows the result. It should be the clearest expression of the project, not necessarily the largest or most elaborate thing you made.
Remove competing objects from the immediate area. If the focal item is a stitched pouch, for instance, a pile of fabric scraps may pull attention away from its shape and construction. Keep one useful material sample only if it helps explain a feature visitors could otherwise miss.
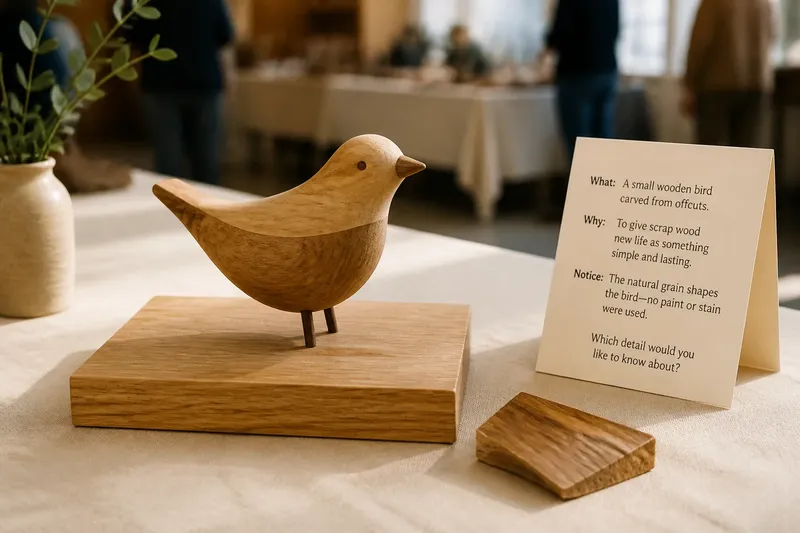
Say you have made a small wooden bird from offcuts and want to share it at a community gathering. You place the bird near the centre of the table, leave its outline unobstructed, and set one offcut beside it to show the material’s origin. Visitors can see the finished form first, then ask about the wood.
2. How can a small table display tell a clear story?
Arrange objects in the order a visitor can understand them: finished work first, then one supporting item that answers a likely question. That support might be a material swatch, a simple process image or a detail that reveals how the piece works. Avoid arranging every stage of the project just because it exists.
Use height sparingly. A low box or book beneath a flat item can lift it into view, while a level surface keeps the display calm. Leave open space around the focal piece so visitors can look without feeling that every inch of the table is occupied.
Check the arrangement from the approach most people will use. If a label or important feature is hidden behind another object, shift it rather than asking visitors to lean across the table. For fragile or awkward pieces, keep the object stable and within the space you have been given.
3. What should the explanation say?
Write a concise explanation that covers three things: what the project is, what prompted it and one detail worth noticing. A few plain sentences usually work better than a full account of every decision. Use everyday language, and define any specialist term that a visitor would need to follow the story.
A small card can carry the basic explanation while leaving you free to add detail in conversation. Set it where it can be read without lifting or moving the work. Keep the lettering legible at a casual viewing distance, and use a simple format such as:
- What: A cloth cover made to protect a pocket notebook.
- Why: The original cover had worn through at the corners.
- Notice: The replacement uses a contrasting patch at each corner.
Adapt that wording to your own project; the point is to give visitors an opening, not to write a sales pitch. If the work has a personal story, share only what you are comfortable discussing in a public setting.
4. How do you keep the display calm and usable?
Choose a restrained background and limit decorative additions. A plain cloth, a sheet of neutral paper or the bare table may be enough. Colour can help distinguish an object, but several competing patterns or signs make it harder to see the work itself.
Think about how people will gather. Keep the front edge clear enough for someone to approach, and do not place small pieces where a sleeve or bag could catch them. If visitors are invited to handle an item, identify that clearly and keep any delicate companion pieces out of the handling area.
Bring only the practical supplies that support the display: a small piece of removable tape for a loose card, a pen for notes, or a clean cloth for dust. Follow the venue’s directions and the maker’s care guidance where relevant; local rules may also determine what can be displayed or handled.
5. What questions help refine the arrangement?
How many objects belong on the table?
Start with the focal item and add only what explains it. If a supporting object draws attention away from the main work or needs its own explanation, leave it out.
Should process photographs be included?
Use a small number only when they reveal a change or decision that the finished object cannot show. Choose images with clear subjects, and place them where they do not compete with the actual work.
What if the project is too small to see clearly?
Raise it on a stable, plain support or provide a close-up image beside it. Keep the real object visible, since a photograph alone may conceal its texture or scale.
How can visitors start a conversation?
Add one inviting prompt to the card, such as “Which detail would you like to know about?” A specific question gives someone an easy way in without requiring them to know what to ask.
6. How should you prepare before the gathering?
Lay out the display at home on a surface similar in size to the space you expect to use. Step back and check whether the focal item is obvious, the card is readable, and the arrangement leaves room to approach. This is a planning check, not a reason to keep adding decoration.
Pack the objects in the order you will place them, with the explanation card and any simple supports together. At the venue, confirm the space available before setting things down. If the table is narrower than expected, remove a supporting item rather than shrinking the space around the focal piece.
A small table display for a personal project succeeds when it makes looking and asking feel easy. Once the main object, explanation and supporting detail are in place, stop adjusting unless something is obscured or unstable. The conversation can then carry the parts of the project that a table cannot show.